Thursday, August 15, 2013

Stuffed Patty Pan Squash With Bacon, Corn and Quinoa


The sun is high and the days are hot! Summer is glowing everywhere, and if your garden is anything like mine, it's hard to keep up with the goodies that are ripening on the vine. Don't have a garden? I'm sure you've noticed the abundance of new produce at your local stores and farmer's markets! I love the beautiful and delicious items to go around this time of year, and with that, the almost endless amount of recipes that can be created from the farm to table eatables.


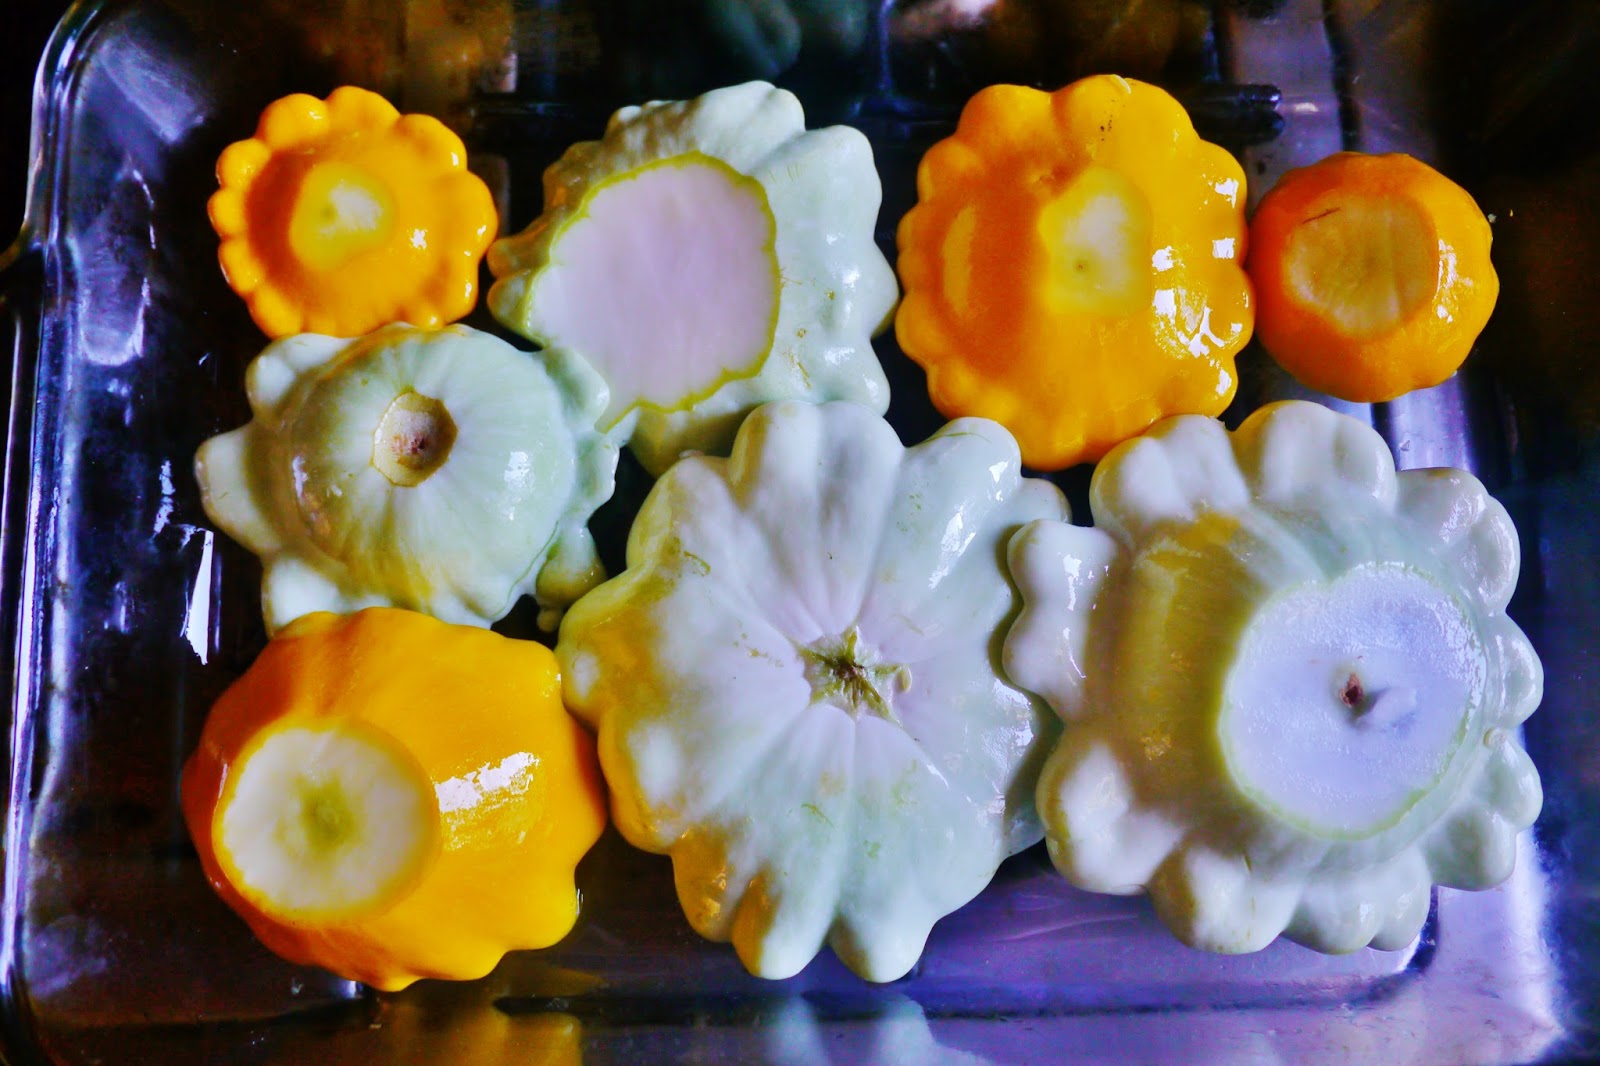
I had planted a couple varieties of patty pan squash this year and have found them to be such a fun addition to the garden. All of a sudden I started noticing the star-like saucer shaped squash hanging around in the sunshine, and after harvesting a few, thought they could make lovely center pieces to a dinner plate or a perfect addition to a summertime potluck party.

This recipe combines ingredients that are readily available in the summer and fall months. The saltiness of the bacon combined with the sweetness of the corn is a fabulous match, and you can't go wrong when you melt a little goat cheese on top and sprinkle on a bit of fresh basil.

Stuffed Patty Pan Squash:

Total Cook and Prep Time: 1 hour
Serves 4-6

Ingredients:
4 medium to large patty pan squash
1 cup quinoa, uncooked
1/2 pound bacon
1 large ear of corn
1 large onion
2 oz chevre goat cheese
1 cup shredded white cheddar cheese
1 teaspoon sea salt
1 teaspoon fresh ground pepper
Several teaspoons of olive oil
Basil for garnish


Begin by preheating your oven to 400 degrees. Start cooking the quinoa by adding one cup dried quinoa to two cups water. Cover and place onto stove top on a medium-high heat. One it starts boiling, reduce to low heat and simmer for about 20 minutes until fully cooked.

Once the quinoa is on the stove, cut the patty pans in half lengthwise. Take a spoon and scrape out the seeded center, but don't throw it away! Put the contents into a small bowl and set aside for later to add to the filling.


Slice of a little bit off the bottom of the squash so that they can sit flat once the filling has been added. Rub them down with olive oil, place face down onto a baking dish, and bake in the oven for about ten minutes. Remove and allow to cool.


Next, cook the bacon to your preferred consistency and chop the onion while the bacon is frying.


When the bacon is fully cooked, transfer it to a plate covered with paper towel. Once cooled, chop into small bits. Add the onions to the bacon grease and cook for about three minutes. Mix in the squash seed filling that was set aside and continue cooking for about five more minutes until the ingredients have caramelized. Stir occasionally.


Peel the ear of corn and remove the hairs. Using a sharp knife, slice off the kernels from the cob.


In a large mixing bowl, combine the cooked quinoa, chopped bacon, sauteed onion and squash, corn, salt and pepper. Using a large spoon, fill the patty pans with the quinoa mixture to create large mounds in the center. Top with chevre and grated cheddar. Return to the oven and bake until the cheese is melted and slightly browned.


Serve with chopped basil on top, and if you're feeling fancy, add a drizzle of some balsamic glaze.


Enjoy!


Sunday, June 30, 2013

Homemade Goat Cheese


A good friend of mine recently gave me several gallons of fresh goat milk straight from her farm. Now, if you have been keeping up with my previous posts you will know that I love goat products and am a huge advocate of incorporating them into your diet. I was excited because this milk was local, raw, organic, and was particularly pungent smelling. My mind immediately went into goat cheese mode and there it stayed for the rest of the afternoon.

The recipe that I am sharing with fun, easy, and results in an absolutely fabulous cheese. Of course, if you can’t find any locally produced, raw goat milk then it is perfectly fine to buy pasteurized milk from the store. If goat products aren't your thing then cow or sheep milk will work just the same, just make sure it has full fat content. As I have mentioned before, goat milk can be a great alternative to cow milk. It has a far lower lactose level making it easier to digest for most people. It is also a great source of protein and calcium.


Homemade Goat Cheese:
Prep and Cook Time: 2 hours

Tools and Ingredients:
1 gallon goat milk
Salt to taste
1/4 cup lemon juice
Large cooking pot
Several layers of cheesecloth
Strainer
2 large bowls
Food processor (optional)
Candy thermometer (optional)


Pour the gallon of milk into the large pot and heat over a medium flame.


Allow the milk to heat to about 180-185 degrees. If you don't have a thermometer handy, you can just let the milk cook until little white bubbles start to form and the top becomes frothy (this is the point right before the milk starts to boil).

Once the milk has reached this point, stir in the lemon juice and let stand for about five minutes. The milk will begin to curdle and become a bit thicker on the top.


Place two layers of cheese cloth over your strainer and set into one of your bowls. Carefully pour the contents of you pot into the strainer. Once you have emptied the pot, you should be left with two items- the curds in your strainer and the whey in the bowl.


Don't throw out the whey! You can keep it and use it after you have made your cheese. Here is a link to a website with lots of ideas for the leftover whey: http://www.theprairiehomestead.com/2011/06/16-ways-to-use-your-whey.html

Take your curds in the cheesecloth and tie off the section into a ball, leaving a bit of free cloth at the top to hang. Let this bundle hang over a bowl and drip out the remaining whey drops for about 1- 1 1/2 hours. You can set this up in your sink, counter top, or any convenient place in your home. 


After about an hour, remove the cheesecloth bundle and open it's contents. You will be left with a ball of soft, crumbly cheese similar to queso fresco. Turn into a bowl and mix in some salt to taste. You can get creative with the flavor of your goat cheese by adding your favorite herbs and spices.


If you prefer crumbly cheese, then your adventure with the goat milk will end here. However, if you want a cheese with a creamy consistency,  put the cheese into a food processor and blend until creamy.


Eat liberally on bread, salad, fruit, or whatever your palate desires!


Sunday, May 12, 2013

Cilantro Pesto


Spring has sprung! I'm so happy to see flowers blooming all around and the local farmer's market in full swing. As the days grow longer and the weather warmer, we begin to see more and more fresh produce in our grocery stores and gardens alike.

In this post I will share with you my very own recipe for cilantro pesto, a favorite of mine this time of year. Cilantro is a very easy herb to grow, but if you don't have space for a garden at your home you shouldn't have a problem finding it for a reasonable price at your local health food store. 

Use this pesto as a salad dressing, a dip for veggies, on top of you eggs in the morning, over chicken, pasta or whatever you desire! It is absolutely scrumptious and adds great color to any meal. I combine plain yogurt and lemon juice for a creamy and tangy punch and little kick of garlic to spice things up a bit, creating the perfect compliment to the fresh cilantro.

Cilantro Pesto:
Yields about 2 cups

Ingredients
2 large bunches fresh cilantro (stems and all)
1/4 cup pumpkin seeds
1/2 cup plain, whole milk yogurt
2 tablespoons olive oil
1 large clove of garlic
Juice from 1/2 a lemon
1/2 teaspoon sea salt

Place all ingredients into a food processor and blend until smooth and creamy.


Use liberally on your favorite foods and enjoy! Refrigerate and use within one week.


Thursday, April 18, 2013

Ferment It Yourself: Homemade Sauerkraut


Bacteria. Most of us hear this word and can't help but cringe. But why? We have been told most of our lives that bacteria is a dangerous and dirty thing to be feared and avoided at all costs. Manufactures of soaps and cleaning products pride themselves with labels that boast"Kills 99.9% of all bacteria!" urging you to keep yourself and your environment as sterile as possible.

While it's important to practice good hygiene and the like, bacteria is not just a creepy entity waiting to wreak havoc on you at any second. There are MILLIONS of strains of bacteria, and some are so essential and good for you that without their presence you wouldn't be able to live a happy and healthy life. 

"Friendly" bacteria, ones found in fermented foods like in the sauerkraut recipe below, are called probiotics and are extremely good for you. During the fermentation process these bacteria grow and not only enhance the flavor of the food and its nutritional value, but once the probiotics are ingested they go to work in your intestines to help regulate the digestion process.

Probiotics also help your emotional state! Did you know that about 90 percent of all of the serotonin, one of the key hormones in your body to help regulate your mood and sense of well being, is located in your gut? The "good" bacteria in your gut help release that serotonin giving you a happier and less stressful state of mind.

Wow!

Making foods full of probiotics is easy, cost effective, and requires very little maintenance. The list of foods that you can ferment is huge! I'm sharing a recipe for a simple sauerkraut, but once you make it and want the flavor a bit more exciting you can add things like ginger, garlic, chili pepper, etc. You can also get creative with fermenting different foods and spices!

Homemade Sauerkraut:

Prep time: 15 minutes
Ferment time: At least 3 days

Tools and Ingredients:
1 large airtight jar or container with lid
Sea salt
2 heads cabbage: I used one green and one purple to give the sauerkraut a nice color
Knife and cutting board
Large bowl


Begin by cutting the cabbage in half and then roughly chopping into one inch pieces. Place chopped cabbage into the large bowl.


Liberally add the sea salt. You want to make sure to put enough salt to create a fairly strong brine. The amount you add will depend on your salt preference. For two large heads of cabbage I start with about 1/2 cup and add more if necessary.


Using your hands, mix and rub the cabbage while squeezing out the water from inside the vegetable. Do this for about 10 minutes until you have obtained enough cabbage juice to just submerge the pieces underneath.


Transfer cabbage and juice into your large jar. Firmly press the cabbage down until it is fully submerged. It should not be exposed to oxygen or else the it will mold and not ferment correctly. If need be, add a little water to fully cover.


Wait for about three days until you try your new creation. Slowly open your jar. You will hear a fizzing sound and will see bubbles rise to the top. This is a good sign! It means that the fermentation process working correctly. You will notice a change in color and smell as the bacteria has had a chance to work it's magic.


Enjoy as a condiment with meals or just eat it by the fork-full! As long as you keep pressing the sauerkraut beneath it's juices it will not need to be refrigerated and can be left out for weeks! The longer you leave it out the more flavorful it will become.
Enjoy!  


Monday, March 18, 2013

Lamb Stew


Spring is almost here!

Almost..

Although the days are getting longer and the blossoms on the trees are starting to show their lovely little faces, the weather has a tendency to change from bright shining sun to cold showers without much warning. The other day I found myself in the middle of a fickle March afternoon and once the cold winds started up I decided to hunker down for the evening and make a pot of something warm and tasty. I had purchased some lamb from my local food co-op and figured a lamb based stew would be perfect for the pre-spring evening. While grocery shopping I had also bought a few bunches of locally grown kale and thought that would be a great addition too. I added a few thing here and there from my kitchen, and after what seemed like no time at all, I had an absolutely delicious meal. The great thing about a stew is, once you throw all of your ingredients in your pot, all you have to do is cover it and keep on a low heat and it just cooks itself. The result is a simple, scrumptious, and nourishing dish!

This recipe is packed full of greens. Kale, spinach, cilantro and green onions add great color and plenty of nutrients to your meal. Kale and spinach are both high in vitamins A, C, and K and are great sources of fiber. Cilantro is an amazing herb due to it's toxic metal detoxification properties! Metal toxins are removed when the chemical compounds found in cilantro cling to the heavy metals and then extract them from your body tissue. Green onions are also good sources of vitamins A and C. They help with blood circulation, stabilizing blood pressure, and are used to help cure cold symptoms.

The spice blend in this stew gives flavors that you would find in Afghan and Indian cuisines. The lamb and greens go very well with the slightly creamy tomato sauce that they are cooked in. So go on down to your local grocery store and make a pot of stew on one of these last winter days! The amount this recipe makes will leave you with left overs for the days to come, or simply store in an air tight container and freeze until a later date.


Cook and prep time: 2 hours
Serves 6-8

Ingredients:

1 lb lamb
2 cups diced tomatoes
1 bunch kale, chopped
1/2 lb spinach
1/2 cup cilantro, finely chopped
2 stalks green onions, finely chopped
1 large yellow onion, finely chopped
4 cloves garlic, minced
1 cup chicken stock
1 cup cream
2 tablespoons ghee or olive oil

Spice Blend:
1 tablespoon melted ghee or olive oil
2 teaspoons turmeric
2 teaspoons coriander
2 teaspoons salt
2 teaspoons dill
2 teaspoons garam masala
1 teaspoons cumin
1 teaspoon crushed red pepper

2 cups brown rice

Lamb Stew:

Begin by slicing up your lamb into 1 inch chunks. Add the oil and half of the spice mixture and toss to evenly coat the meat. Cover and set aside.


Heat oil in a large sauce pan. Add the chopped onions and cook over medium-high heat until translucent, about 8 minutes.


Add kale, spinach, cilantro, green onions and diced tomatoes and cook for another 5 minutes or so until the greens have wilted down.


Add the lamb, chicken stock, and the other half of the spice mixture. Mix well, cover, and reduce heat to a low simmer. Cook for about 40 minutes. Add the cream, stir well, and cook for another 10-15 minutes.


Start cooking your rice once you have left the stew to simmer. Bring 3 1/2 cups of water to boil and add 2 cups of brown rice. Cover and reduce to a very low heat and simmer for about 30 minutes. Turn off the heat, keep covered, and let stand for about another 10 minutes.

Once the rice had finished cooking, scoop desired portion onto a plate or bowl and generously cover with the stew. Garnish with fresh cilantro and Enjoy!


Monday, March 4, 2013

Tender Golden Tacos


If you  are searching for an outstandingly tasty and easy to make meal, then look no further!  These tender "golden" tacos fully live up to their name as being a treasure for your mouth to find...
Alright, as cheesy as that may have sounded, in all seriousness this is a truly savory and succulent recipe not to be pushed aside. The filling is comprised of baked chicken seasoned with smoked paprika and a curried cabbage and carrot slaw. It is juicy, full of flavor, and the chicken practically melts in your mouth. The color combination of the smoked paprika and the curry powder gives them their golden color. Despite the rich flavors and textures, these tacos don't leave you feeling heavy after eating them, making it a perfect dish for the transition from winter into spring time. 


Tender Golden Tacos:
Prep and cook time: 40 minutes
Serves 2-4

Ingredients:

Smoked Paprika Chicken:
1 lb. organic boneless, skinless chicken thighs
2 tablespoons extra virgin olive oil
1 tablespoon smoked paprika
1/2 teaspoon sea salt

Curried Cabbage Slaw:
1 small cabbage head
1 large carrot
4 tablespoons plain yogurt
1 tablespoon white wine vinegar
1/4 teaspoon curry powder
1/4 teaspoon sea salt

One package of your favorite corn tortillas
One green onion to garnish


Preheat oven to 375 degrees

Place chicken thighs into a small baking dish and add olive oil, smoked paprika and salt. Mix well until thighs are thoroughly coated. Bake for about 25 minutes.


Begin making your slaw while you are waiting for the chicken to cook. Cut the cabbage in half and then into fine 1-2 inch strips. Grate the carrot and add to the cut cabbage. Add the yogurt, vinegar, curry powder and salt and mix well.


About 5 minutes before the chicken is finished, heat up the tortillas in an ungreased skillet on the stove top until they are hot and easily bendable. Transfer to a plate and cover to keep warm.

Once the chicken is fully cooked, remove from oven and tear apart the thighs into strips using two forks. 


When all of the chicken is shredded you can begin to assemble the tacos! Put a generous fork full of meat onto each of the tortillas and a spoon full of slaw on top of that. Garnish with some sliced green onions and serve immediately.


Friday, February 22, 2013

Roasted Turnip Ghanoush


I just recently celebrated my birthday and was given a wonderful new cookbook titled Roots by Diane Morgan. It's a beautifully put together book of over 225 recipes centered around root vegetables and root spices with gorgeous photos to accompany. The chapters are dedicated to specific roots (beets, parsnips,etc.) tubers (potatoes, yams, etc.) rhizomes (ginger, turmeric, wasabi etc.) and corms (arrowhead, water chestnuts, etc.) and each is described with a little background on it's history and lore, variety, nutritional value, availability, proper storage, and basic preparation techniques.


I was thrilled when I opened this gift, especially since many of the root vegetables listed in this book are in abundance this time of year. I decided that I had to make one of the recipes and post it on The Flavor Effect for all of you to try. There are so many enticing entries that it seemed a bit overwhelming to choose just one, but once I flipped to the chapter about turnips and saw the first recipe, roasted turnip ghanoush, I knew it would be the winner.

Baba Ghanoush is a traditional Middle Eastern dish made up of roasted eggplant puree with sesame tahini and spices. This version substitutes turnips for the eggplant, and adds dates and yogurt to sweeten it up bit and give a creamy texture. Before cooking this recipe I had no idea how amazingly delicious it would actually be. The ghanoush gives a sweet, tangy, and slightly nutty flavor with a kick of spicy garlic that lingers on your taste buds and leaves you begging for more. It is the perfect dish for the next potluck you attend accompanied with some cut raw vegetables, crackers, or bread to dip into the spread. It would also be great to keep in your fridge as a condiment for sandwiches or bagels.

Turnips are very low in calories and are packed full of vitamin C, making them a perfect choice for winter months to boost your immune system when cold season seems to be at its peak. If you purchase turnips with the leaves still intact, add them to a soup or stir-fry instead of tossing them in the compost. They are an excellent source of vitamins A, C, and K as well as potassium and calcium.

Roasted Turnip Ghanoush:
Makes about 4 cups
Cook and prep time: 1 1/2 hours

Ingredients:
2 lbs. turnips (about 4 medium)
1 cup pitted dates
1 cup water
1/2 cup plain yogurt (I use goat yogurt due to the reduced lactose for easy digestion)
1/3 cup roasted sesame tahini
Juice from 1 lemon
2 cloves garlic
2 teaspoons sea salt
1/4 teaspoon freshly ground pepper
1 tablespoon finely chopped flat leaf parsley

Preheat oven to 375 degrees. Place unpeeled turnips onto a baking dish and bake for about 45 minutes to 1 hour or until very soft. Transfer to a bowl and cover to cool. The steam will make it easier to peel the skin off.


While the turnips are roasting, put the water and dates into a small sauce pot and boil for about 5 minutes until dates become soft. Transfer to a food processor and blend until pureed. Set aside to cool and measure out 1/3 cup to use in the ghanoush. The remaining puree can be stored in the refrigerator for up to a month and can be used for your next batch of ghanoush or simply use as a spread on some crackers or bread for a naturally sweet snack.


When the turnips are cool enough to handle, peel off and discard the skin. Cut turnips into small chunks and add to the food processor along with the yogurt, date puree, tahini, garlic, lemon juice, salt, pepper, and parsley. Process until smooth and creamy.


Transfer to a serving dish and enjoy!